WEB DATA DRIVEN
Full Service Digital Solutions
Comprehensive Digital Solutions: Expert Campaign Design, Website Development, CRM Implementation, and Cybersecurity Services
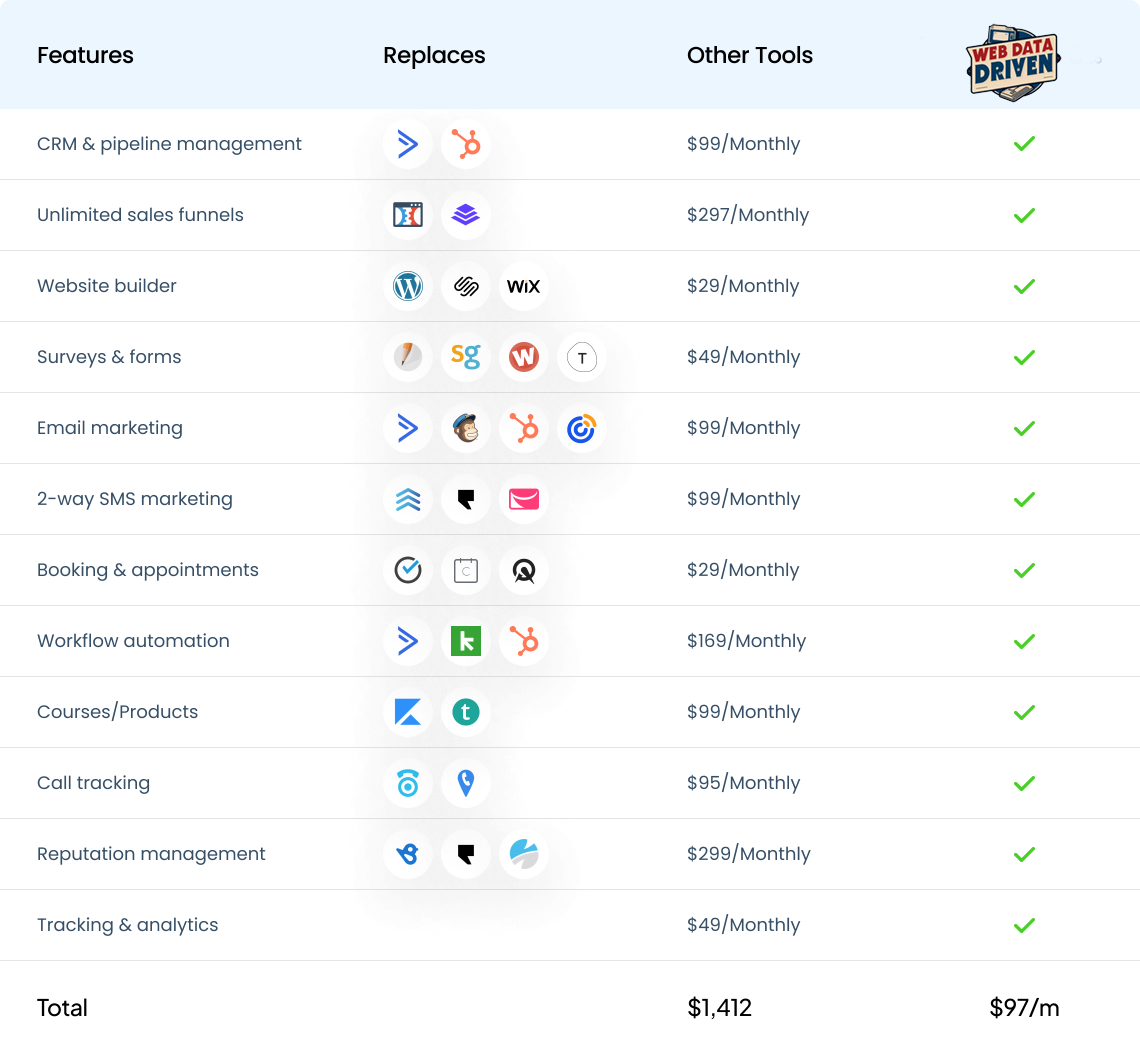
COMPARED TO OTHER SOFTWARES
Replace Them All With Our Tool
Consolidate Your Needs with Our All-In-One Solution

cancel anytime - no questions asked
No matter your business you are covered.

All-in-One CRM Solution
Manage your entire business from one platform. From sales and marketing automation to customer service,
Web Data Driven streamlines operations across all industries.
Insurance
Day Spa
Real Estate
Landscaping
HVAC
Dental Practice
Gym
Auto Dealer
Travel Agent
Tax Advisor

Why choose Web Data Driven
Key Features of Web Data Driven
Lead Management
Efficiently capture, nurture, and convert leads with our advanced lead management tools. Track lead sources, score leads based on engagement, and automate follow-up communications to boost conversion rates.
Contact Management
Keep all your customer information organized and easily accessible. Manage contact details, track interactions, and segment your audience for targeted communication.
Reporting and Analytics
Make data-driven decisions with comprehensive reporting and analytics. Generate detailed reports on sales, marketing, and customer service performance, and visualize key metrics with customizable dashboards.
Marketing Automation
Automate your marketing campaigns across multiple channels. Schedule email campaigns, create automated workflows, and track campaign performance to optimize your marketing efforts.

GAIN VALUABLE INSIGHT WITH PATCHLIT
Discover How Patchlit Transforms Quizzes & Assessments into Actionable Insights for Smarter Decisions and Optimal Outcomes


Experience the Future of CRM with Web Data Driven
Comprehensive Automation
Web Data Driven's powerful automation tools streamline your business operations, reducing manual tasks and increasing efficiency. Automate workflows, lead management, and marketing campaigns to ensure your team focuses on high-priority activities. By automating repetitive processes, you can save time and resources, ultimately boosting productivity and profitability.
Seamless Integration and Customization
Web Data Driven is designed to integrate seamlessly with your existing systems and workflows. Our platform is highly customizable, allowing you to tailor the CRM to meet your specific business needs. Whether you need custom reports, specialized dashboards, or unique automation workflows, Web Data Driven provides the flexibility to adapt to your requirements, ensuring a smooth transition and minimal disruption to your operations.
Comprehensive Support and Training
We understand that adopting a new CRM system can be challenging. That's why Web Data Driven offers comprehensive support and training to help you get the most out of our platform. Our dedicated support team is available to assist with any issues or questions, and our training programs are designed to ensure your team is fully equipped to utilize the CRM effectively. With ongoing support and resources, you can be confident in your investment and see a quick return.
Easily Boost SEO
Enhance your online presence and attract more visitors with our powerful SEO tools. Effortlessly optimize your website, improve search engine rankings, and drive targeted traffic to your business. With our user-friendly platform, you can implement effective SEO strategies, track performance, and see real results. Elevate your visibility and grow your audience with ease.

Frequently Asked Questions
Web Data Driven is an all-in-one CRM solution designed to streamline business operations across various industries. It offers advanced features like automation workflows, lead management, contact management, task management, reporting and analytics, and marketing automation, all integrated into one platform.
What Web Data Driven?
Web Data Driven is an all-in-one CRM solution designed to streamline business operations across various industries. It offers advanced features like automation workflows, lead management, contact management, task management, reporting and analytics, and marketing automation, all integrated into one platform.
How can Web Data Driven improve my business?
Web Data Driven enhances your business by automating repetitive tasks, managing leads effectively, organizing contacts, and providing in-depth reporting and analytics. This allows your team to focus on high-priority activities and make data-driven decisions, ultimately increasing efficiency and productivity.
Is Web Data Driven suitable for small businesses?
Yes, Web Data Driven is scalable and can be tailored to fit the needs of small businesses as well as large enterprises. Its flexible features and customizable workflows make it an ideal solution for businesses of all sizes.
How secure is my data with Web Data Driven?
Web Data Driven prioritizes security and uses advanced encryption and cybersecurity measures to protect your data. Our platform includes features like encrypted email and digital vaults, ensuring your sensitive information is safeguarded against threats.
What kind of customer support does Web Data Driven offer?
We offer comprehensive customer support through various channels, including email, phone, and live chat. Our support team is available to assist you with any questions or issues you may encounter while using our platform.
Is there a mobile app for Web Data Driven?
Yes, Web Data Driven offers a mobile app that allows you to access your CRM on the go. The app provides key features of the platform, enabling you to manage your business operations from anywhere.
Can I customize the features of Web Data Driven to fit my business needs?
Absolutely. Web Data Driven is highly customizable, allowing you to tailor the features and workflows to align with your specific business processes and goals. Our team will work with you to ensure the platform meets your unique requirements.
What is the pricing structure of Web Data Driven?
Our pricing structure is flexible and designed to accommodate businesses of all sizes. We offer various plans based on the features and number of users you need. Contact us for detailed pricing information and to find the plan that best fits your business.
© Powered by Web Data Driven - All Rights Reserved.


